 An intro to climbing class is less about learning how to climb than it is about learning how to fall. Or rather, how not to fall — and if you do (and you will), how to fall without bone-breaking repercussions. That’s a good thing because once you’re assured that it’s OK to fall, that you won’t break your skull should you part with the wall, your confidence — a key element of climbing — will carry you to new heights. Literally.
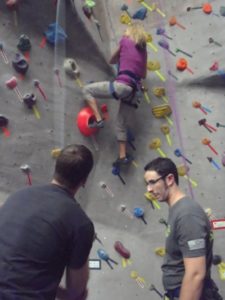
That concept became apparent to the seven of us in our recent Intro to Climbing class at Raleigh’s Triangle Rock Club. If we didn’t have an appreciation for not falling off the wall from 20 feet up at the start of class, we did after spending the first hour of our two-hour session going over our “protection” — the equipment that would spare us should we part ways with the wall. We started with learning how our climbing harness worked, progressed to putting it on, learned a simple (for some) figure-8 knot, and learned to work our ingeniously simple belay device. And while we had come to climb, no one complained about spending the first hour on the ground, likely because our balcony classroom overlooked all 9,000 square feet of the gym’s climbing wall — a wall where climbers were routinely dropping only to be caught by their climbing partners. Mike was in the midst of demonstrating the belay device when we heard a faller yell — “Uhhhhhh!” — causing us to turn on our heels and catch the victim dangling by his climbing rope.
Mike doesn’t mind the interruption. Each time we hear someone fall behind us, we pay that much more attention to him. Like when he looks at the buckle on his harness and says, “Now if you see the word ‘Danger’ here, that means you’re in danger.” We all check our belts for ominous wording as Mike explains that an exposed “Danger” means you haven’t doubled-backed the harness’s belt through your buckle. Thus, it’s easier for your belt to come undone, which could result in more severe consequences than just your pants falling to the floor. Mike has us practice buckling in once, twice —
“Uhhhhh!”
Most of us buckle in a third time, just to be safe.
 Convinced that our harnesses are properly affixed, Mike moves on to communication. Here, he becomes part climbing instructor, part Dr. Phil. The relationship between climber and belayer better be one of the best relationships you’ve got, he lets us know. None of this, “Your-hair-looks-great-with-orange-streaks-really!” when what you really mean is “You-joining-the-circus?” If something’s amiss with your partner’s hair, be straight up about it. Likewise, if his figure-8 knot appears to be more of a figure 6, or if her belay rope is threaded upside down, speak up. Communication is the foundation of safe climbing.
Before lifting a foot off the ground, the belayer checks the climber’s equipment — the figure-8 knot, the harness for signs of “Danger” — to make sure everything is copacetic. The climber does likewise, checking to make sure the rope is properly threaded through the belay device, the carabiner locked down. After checking one another out, it’s time for clearance from the tower.
“On belay?” the climber asks the belayer to make sure the later is prepared.
“Belay on,” the belayer responds, signifying he’s ready.
“Climbing,” the climber says, seeking final clearance.
“Climb on,” the belayer responds, granting permission to ascend.
It’s time to climb.
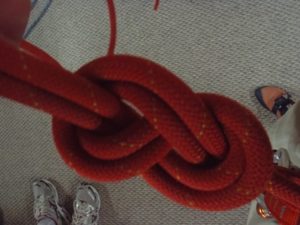
The dread figure-8 knot.
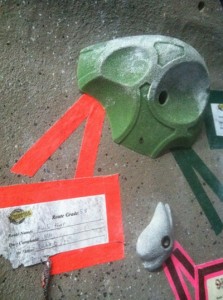
To our novice eyes, the climbing walls appear to sport a random scattering of colorful molded polyurethane holds. Some of the holds are whimsical: from faces where the eye sockets and mouth serve as finger holds (or “pockets”), to everyday objects — telephones, lightbulbs — protruding from the hold. Most are simply angular or rounded blobs. Some, referred to as “jugs,” are sizable and easy to grasp. Some are the smallest of nubs that you can’t imagine serving any purpose. As we stare up the wall, though, we notice that nearly all of the holds — and there are perhaps 20 on any one route — have a strip of colored tape next to them. At the bottom, the tape is marked with a number — ranging from 5.5 to 5.13 — and a name, sometimes amusing (“Juggy Uppy”), sometimes ominous (“Evil Without”), sometimes head scratching (“Toilet Water”). Looking up the wall we notice strips of the same colored tape marking certain holds in a pattern, of sorts, up to the top. Some colors, usually those associated with the bigger, juggier holds, are close together. Others, those marking the smaller holds, seem far apart.

Those related colors, Mike tells us, make up routes. In accordance with the rock climbing world’s Yosemite decimal system, the smaller the number, the easier the route. Thus, our class will start on the 5.5s. Someday, if we work hard, have supernatural strength and emerge as the Lance Armstrong of the sport, we might be able to do a 5.13.
Fortunately, according to Scott Gilliam, TRC’s chief route setter, the 110 or so routes up at any one time are divvied up to reflect the climbing expertise of they gym’s membership. The Triangle Rock Club has its share of hard core climbers, but it also has a goodly number of folks not much more advanced than us. Thus, there are plenty of beginner-friendly routes in the 5.5, 5.6 and 5.7 range. “I try to peak around 5.9 and 5.10,” Scott tells us. “You won’t find many 5.13s.”
Today, we’ll concentrate on the 5.5s. To make our introduction even easier, in addition to the same color tape marking the 5.5 routes, the holds are the same color — yellow.
No one in my class of eight is out of shape. In fact, everyone is active in some other pursuit: running, cycling, triathlon. And while that’s no doubt an advantage, it also becomes clear on our first climb that you don’t have to be a wiry athlete to be a recreational climber.
“If you can climb a ladder, you can climb,” says TRC spokesman Joel Graybeal.
Our forays up two 5.5 routes are surprisingly easy, their ease ensured by following one key piece of advice: It’s not your arms that count, it’s your feet. Your initial inclination, especially as you get farther from the ground, is to cling to the wall. That, we quickly discover, quickly zaps your arm strength. Rather, put your weight directly over your feet, which requires that you ease your body back from the wall. Counterintuitive and a bit disconcerting at first, but natural once you get the hang of it.
So we scamper up the 25-foot wall, and while I’ll later learn that a great training exercise is to downclimb the route you went up, it’s time for another lesson from Dr. Phil, this one about communication and trust. Once at the top, it’s time to let our partner get some experience catching us and lowering us to the floor. That will require letting go of the wall. Again, from 25 feet up. But first, some more open communication.
“Take!” yells the climber, informing her belayer that she would like to be gently lowered to Earth.
“Gotcha!” yells back the belayer, which in climbing parlance means, “I’ve got you. Trust me.”
Much to your relief, they do.
* * *
Interested?
For information on …
- The Triangle Rock Club, go here.
- Other climbing walls open to the public in North Carolina, go here.
- Climbing in North Carolina, visit the Carolina Climbing Coalition website here.
- And for a smorgasbord of videos on learning to climb, go here.
One thought on “Climbing: Before you go up, you gotta learn to come down”